Training Models with the Segmentation Wizard
With the Segmentation Wizard, you simply paint the different features of interest within a limited subset of your image data and then train models to identify objects according to a predefined set of rules. The most promising model can then be fine-tuned and published for repeated segmentation tasks. This empowers any user to achieve robust and reproducible segmentation results that are not influenced by user bias. The main tasks for training semantic segmentation models with the Segmentation Wizard are labeling classes in frames, choosing a model generation strategy, and then training the models within the selected strategy.
You can use any of the segmentation tools available on the ROI Painter and ROI Tools panels to label the voxels within a frame for training a model (see Multi-ROI Classes and Labels). The classes and labels defined for training are available in the Classes and labels box, as shown below.
Classes and labels box

You should note that how frames are labeled — either with sparse labeling or fully segmented frames — will determine which models can be generated initially.
Sparse labeling… In this case, only Machine Learning (Classical) models can be generated. However, after the first training cycle is completed or stopped, you can then populate frames with the best prediction, edit the results, and then generate and train Deep Learning models. An example of sparse labeling is provided below.
Sparsely labeled frame

Dense labeling… In this case, both Machine Learning (Classical) models and Deep Learning models can be generated. You should note that the requirement to generate a Deep Learning model is a minimum of three patches — one for training, one for validation, and one for testing — that do not overlap and that are equal to or larger than the biggest patch size in the model. In addition, all patches must include labels from each class. An example of a fully segmented frame is provided below.
Densely labeled frame

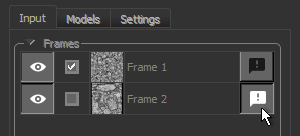
To help monitor and evaluate the progress of training Deep Learning models, you can designate a frame for visual feedback. With the Visual Feedback option selected, the model’s inference will be displayed in the Training dialog in real time as each epoch is completed, as shown on the right of the screen capture below. In addition, you can create a checkpoint cache so that you can save a copy of the model at a selected checkpoint (see Enabling Checkpoint Caches and Loading and Saving Model Checkpoints). Saved checkpoints are marked in bold on the plotted graph, as shown below.
Training dialog

- Add a frame to a representative slice that does not include any labels.
- Click the Enable Frame for Visual Feedback button in the Frames list, as shown below.
In some cases, you may want to provide multiple inputs for training models with the Segmentation Wizard. For example, when you are working with data from simultaneous image acquisition systems. You can select multiple inputs for the Segmentation Wizard, either in the Data Selection dialog or by selecting the multiple inputs in the Data Properties and Settings panel beforehand.
You should note the following whenever you work with multi-modality models:
- All input datasets must be registered and have the same geometry and shape.
- The number of modalities for Deep Learning and Machine Learning (Classical) models is generated automatically based on your initial data selection.
- You can choose different feature trees for each input of a Machine Learning (Classical) model in the Model Generator dialog, as shown in the following screen capture.

-
You can reorder and rename your datasets in the Image modalities prior to training. To reorder an item, simply drag it up or down in the list, as shown below.
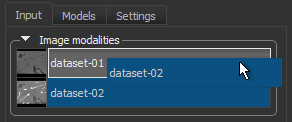
- While labeling classes, you can switch the dataset in the view by selecting another item in the Image modalities box, as well as with keyboard shortcuts Show Next Image Modality and Show Previous Image Modality.
- Defined ranges for each dataset will be retained whenever you navigate between the different input images. You should also note that the opacity of the range highlight is selectable.
- Reopened Segmentation Wizard sessions will open automatically on the last modality that was visible in the workspace.

You can start training models for semantic segmentation in the Segmentation Wizard after you have labeling at least one frame.
- Do one of the following:
- On the Data Properties and Settings panel, right-click the image data that you want to train the models with and then choose Segmentation Wizard in the pop-up menu.
- Choose Artificial Intelligence > Segmentation Wizard on the menu bar.
In this case, you can choose to create a new Segmentation Wizard session or to open a loaded Segmentation Wizard session (see Loading Session Groups).
- Choose the required input(s) in the Data Selection dialog, as shown below, and then click Continue.
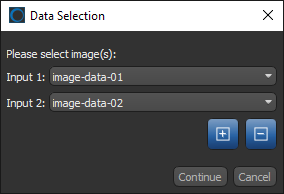
Note Input order is important for multi-modality training and must be consistent when applying a trained model to a full dataset.
The Segmentation Wizard appears onscreen (see Segmentation Wizard Interface).
- Scroll through the image stack and adjust the view so that the area you plan to label first is maximized in the view (see Using the Manipulate Tools).
Note Refer to the topic Window Leveling for information about adjusting the brightness and contrast.
- Click the Add
 button in the Frames box.
A new frame is added to the main view in the workspace and two classes appear in the Classes and labels box. You can adjust the size and position of the frame, if required.
Note If have already prepared a multi-ROI with the required labeling, you can fill the frame by right-clicking and then choosing Fill Frames from Multi-ROI. In this case, you then need to select the multi-ROI in the Choose a Multi-ROI dialog, shown below.
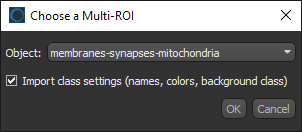
Note Only labeled multi-ROIs that have the same geometry as the input dataset will be available in the drop-down menu.
- Do the following, as required:
- Add additional classes.
To add a class or classes, click Add in the Classes and labels box and then choose Add Class or Add Multiple Classes. If you are adding multiple classes, choose the number of classes to add in the Add Classes dialog.
- Rename the classes and change the assigned colors, recommended.

- Label the classes with the ROI Painter tools, as required (see Labeling Frames for Training).
You can deploy two different labeling strategies to train new models — sparse labeling, in which case only Machine Learning (Classical) models can be generated, and fully segmented patches, in which case both Machine Learning (Classical) and Deep Learning models can be generated.
Note If you are training with multiple modalities, you can switch the image data shown in the frame by selecting another item in the Image modalities box, as well as with keyboard shortcuts Show Next Image Modality and Show Previous Image Modality.
- Add additional classes.
- Add additional frames and continue labeling classes, as required.
- Add a frame for visual feedback, if you plan to generate Deep Learning models (see Enabling Visual Feedback and Checkpoint Caches).
- Click Train.
The Model Generation Strategy dialog appears (see Model Generation Strategies).
Greyed out models just mean that for whatever reason, they cannot be generated currently. This could be due to sparse labeling, inadequate labeling, or another issue. However, greyed out models are still selectable. - Select a strategy, as required.
If required, you can deselect any of the models in the selected strategy. Deselected models will not be generated when you click Continue.
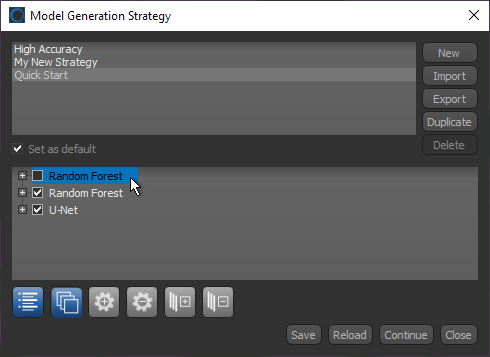
You should note that greyed out models cannot be generated currently. This could be due to sparse labeling, inadequate labeling, or another issue.
Note If required, you can edit the parameters of Deep Learning models and the feature presets of Machine Learning (Classical) models for the current Segmentation Wizard session (see Deep Learning Model Types and Machine Learning (Classical) Model Types).
- Click Continue.
The selected models are generated one-by-one and then the dataset(s) is validated and automatically split into training, validation, and test sets. For Deep Learning models, you can monitor the progress of training in the Training Model dialog, as shown below.

During Deep Model training, the quantities 'loss' and 'val_loss' should decrease. You should continue to train until 'val_loss' stops decreasing. You can also select other metrics, such as 'ORS_dice_coefficient' and 'val_ORS_dice_coefficient' to monitor training progress.
Note You can also click the List tab and then view the training metric values for each epoch.

When training is completed or stopped, up to the best three results appear at the bottom of the workspace.
- Evaluate the model predictions in the Prediction views, recommended.

Each model prediction view includes the name of the corresponding model and includes the following controls:
- Clicking the Up arrow fills the current frame with the selected model prediction.
- The Default Model checkbox lets you select the model that will be used to automatically fill frames whenever the 'Automatically fill new frames with best prediction' option is selected on the Settings tab (see Settings Tab).
Note The number of predictions shown is selectable on the Models tab (see Models Tab).
- If the results are not satisfactory, you should consider doing one or more of the following and then retraining the model(s):
- Add an additional frame or frames to provide more training data.
Note You can fill additional frames from a multi-ROI or from a prediction. These options are available in the pop-up menu for frames.
- Add or remove models (see Generating New Models).
- Adjust the parameters of a model (see Training Parameters for Deep Learning Models).
- Add an additional frame or frames to provide more training data.
- When the model or models are trained satisfactorily, click the Exit button.
You can then select the model or models that you want to publish in the Publish Models dialog, shown below.
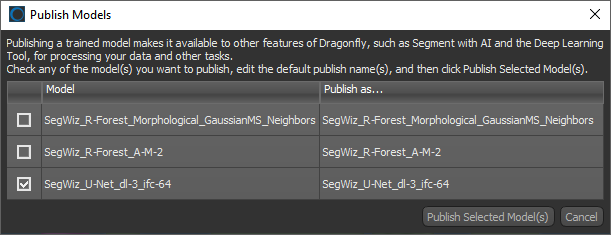
Note You need to 'publish' a model to make it available to other features of Dragonfly, such as Segment with AI (see Segment with AI) and the Deep Learning tool (see Deep Learning), for processing your data and other tasks.
The Segmentation Wizard session is saved and a new session group appears on the Data Properties and Settings panel (see Segmentation Wizard Session Groups).